Creating a Window
The following code demonstrates the minimal setup required to create a window:
#include "engine.hpp"
#include "window.hpp"
int main(int, char**) {
return 0;
}
Intiliazes the ComponentManager and the ResourceManager and ofers functions to retrieve them.
Definition: engine.hpp:12
Creates and updates a window.
Definition: window.hpp:20
bool isDone()
Checks if the user wants to close the window and performs internal frame updates.
static Window Make(Engine &engine, int width, int height, const std::string &title)
Creates a window.
Here, we create an Engine object. This class initializes internal components and serves as your gateway to the ResourceManager and the ComponentManager. Then, we need to create the Window where the scene will be displayed. Lastly, we loop to ensure the window is not automatically closed.
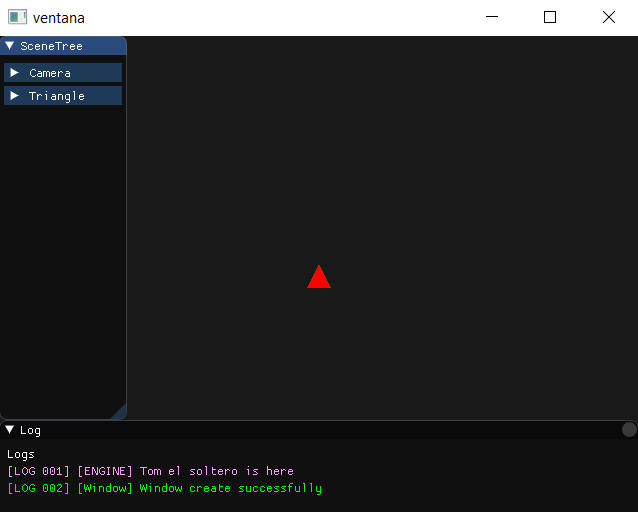
Drawing to the Window
In this section, we will explore the process of rendering objects to the window. To achieve this, we'll create a Renderer, set up a camera using the Entity-Component System (ECS), and visualize a simple red triangle.
Creating the Renderer
Creating the Renderer is pretty straightforward. Since we are not using lights, we will set the ambient light to 1 so that we display the real color of the object:
Class used to render the scene.
Definition: renderer.hpp:49
Creating the Camera
To create a camera, we need to make use of the ComponentManager, which can be retrieved from the Engine. With that, we can create an entity with no parent, a TransformCmp, and a CameraCmp.
nullptr,
"Camera",
TransformCmp(Vec3(0.0f, 0.0f, 5.0f), Vec3(0.0f), Vec3(1.0f)),
);
Handles anything related to entities and components in the engine.
Definition: component_manager.hpp:29
Entity addEntity(Entity *parent, const std::string &editor_name, const T &... args)
Creates an entity and assigns the specified components to it.
Definition: component_manager.hpp:58
ComponentManager & getComponentManager() const
Retrieves the ResourceManager.
Definition: engine.hpp:43
@ kOrtho
Renders a 3D scene as 2D without depth.
Component used to render the scene. There must be one and only one of this component on the scene.
Definition: default_components.hpp:161
Components in depth
Creating the Triangle
We now need to create something to visualize. In this case, we will draw a red triangle. To do so, we will need an entity with a RenderCmp and a TransformCmp. But first, we will need to use the ResourceManager to get the mesh of the triangle.
nullptr,
"Triangle",
&resource_manager.
getMesh(BasicMesh::kTriangle),
Vec3(1.0f, 0.0f, 0.0f)
)
);
ResourceManager & getResourceManager() const
Retrieves the ResourceManager.
Definition: engine.hpp:37
Stores and offers access to all meshes, textures, and sounds of the engine.
Definition: resource_manager.hpp:27
const Texture & getEmptyTexture() const
Retrieve a white texture.
const Mesh & getMesh(const std::string &id) const
Retrieve a mesh.
Component used to render an object.
Definition: default_components.hpp:237
One of the good things about ECS is that we now just need to call the system, and all the entities will be updated. So, we just need to call Renderer::render in the main loop, and our triangle should appear on the screen. Here is the complete code of the demo:
#include "window.hpp"
#include "ecs/component_manager.hpp"
#include "engine.hpp"
#include "renderer.hpp"
int main(int, char**) {
nullptr,
"Camera",
);
nullptr,
"Triangle",
&resource_manager.
getMesh(BasicMesh::kTriangle),
)
);
}
return 0;
}
void render()
Used to render the entire scene with all the entities.
represents mathematical vector with 3 components
Definition: vector_3.h:12
contains globally accessible enums
copperdielf Math Library
Definition: buffer.hpp:5
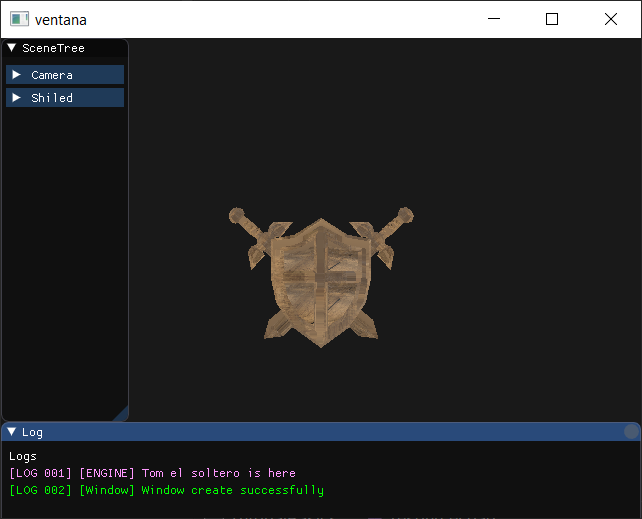
Loading Resources
Now, instead of using a red triangle, we are going to be loading our own meshes and textures.
For that, we will first need to get a mesh and a texture. You can use the ones that come with the demo project, but feel free to use the ones you like. Meshes must be in .obj format, and textures in .png or .jpg.
"../assets/obj/pollo.obj",
"Shield"
);
"../assets/textures/box.png",
"Crate"
);
void loadResource(const ResourceType &resource_type, const std::string &file_path, const std::string &identifier)
Load an external asset from a file using multithreading.
bool WaitResourceLoad()
Stops the program, waiting for resource loading to complete.
@ kTexture
Texture accepts .png and .jpg.
@ kMesh
Mesh accepts .obj.
When loading one or multiple assets, **WaitResourceLoad must be called once before using any of the loaded assets.**
To use the resource, we will replace the triangle we made in the previous code with a new entity:
nullptr,
"Triangle",
&resource_manager.
getMesh(
"Shield"),
)
);
const Texture & getTexture(const std::string &id) const
Retrieve a texture.
Lastly, we will change our camera from ortho to perspective so that we can properly visualize the object.
Just with that, we should be able to see our mesh with the texture.
#include "window.hpp"
#include "ecs/component_manager.hpp"
#include "engine.hpp"
#include "renderer.hpp"
int main(int, char**) {
"../assets/obj/sword_shield.obj",
"Shield"
);
"../assets/texture/box.png",
"Crate"
);
nullptr,
"Camera",
);
nullptr,
"Triangle",
&resource_manager.
getMesh(
"Shield"),
)
);
}
return 0;
}
@ kPerspective
Renders regular 3D using depth.
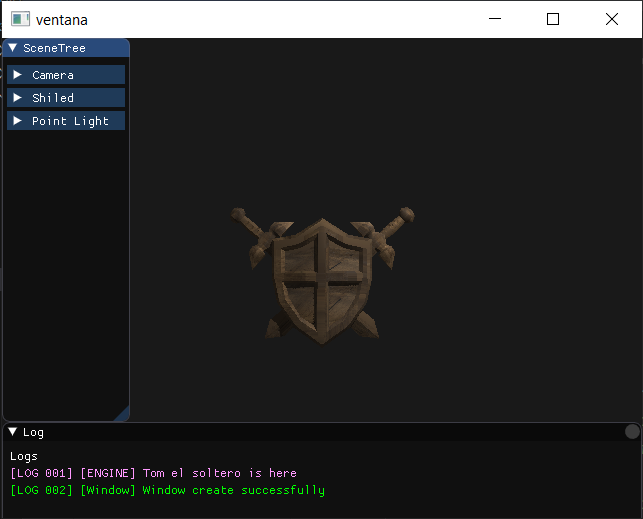
Adding Lights
Adding lights is pretty straightforward once you understand entities and components. The only thing we need is to create an entity with a LightCmp.
In our specific example, we will also need to modify the way we create the renderer because we have the ambient light set to one, so adding light will only add reflections.
nullptr,
"Point Light",
);
Component used to simulate different types of lights.
Definition: default_components.hpp:69
#include "window.hpp"
#include "ecs/component_manager.hpp"
#include "engine.hpp"
#include "renderer.hpp"
int main(int, char**) {
"../assets/obj/sword_shield.obj",
"Shield"
);
"../assets/texture/box.png",
"Crate"
);
nullptr,
"Camera",
);
nullptr,
"Triangle",
&resource_manager.
getMesh(
"Shield"),
)
);
nullptr,
"Point Light",
);
}
return 0;
}
Input
To add input, the first thing is to define an InputButtonMap and create an InputMap with it. All the InputManager must be declared after the Renderer input wont work otherwise.
{"Up",{InputButton::W,InputButton::UP}},
{"Down",{InputButton::S,InputButton::DOWN}},
{"Left",{InputButton::A,InputButton::LEFT}},
{"Right",{InputButton::D,InputButton::RIGHT}},
};
Once we have that in the main loop, we can detect the input using the input manager we created:
But to actually update an entity with that, we will need to have its components. To retrieve them, we will first go to the creation of our shield entity and retrieve its value. and then cache its transform cmp:
nullptr,
"Shield",
&resource_manager.
getMesh(
"Shield"),
)
);
T * getComponent(Entity entity) const
Retrieves a component for a specific entity.
Definition: component_manager.hpp:117
Identifies an entity. This class can only be modified by the engine.
Definition: component_manager.hpp:16
Now, in the main loop we had before, we can update the position of the component. We use Time::DeltaTime to get the time elapsed on the last frame and make the movement framerate independent. You can multiply it by any amount to adjust the movement speed:
}
}
}
}
static float DeltaTime()
Retrieves the duration of the last frame.
Complete code:
#include "window.hpp"
#include "ecs/component_manager.hpp"
#include "engine.hpp"
#include "renderer.hpp"
#include "time.hpp"
{"Up",{InputButton::W,InputButton::UP}},
{"Down",{InputButton::S,InputButton::DOWN}},
{"Left",{InputButton::A,InputButton::LEFT}},
{"Right",{InputButton::D,InputButton::RIGHT}},
};
int main(int, char**) {
"../assets/obj/sword_shield.obj",
"Shield"
);
"../assets/texture/box.png",
"Crate"
);
nullptr,
"Camera",
);
nullptr,
"Shield",
&resource_manager.
getMesh(
"Shield"),
)
);
nullptr,
"Point Light",
);
}
}
}
}
}
return 0;
}
Custom Components and Systems
The result of this tutorial will be very similar to the last one, but it's important to learn how to create custom components and systems to unlock the full potential of the engine. Instead of updating the transform directly, we will create a MovementCmp that will hold a direction and a speed, and then we will use a system to update the transform based on the direction and speed stored in the component.
struct MovementCmp {
float speed = 0;
};
while (iterator.next()) {
auto [move_cmp, transform_cmp] = iterator.get();
transform_cmp.position_ +=
}
}
Helper to iterate several component lists simultaneously.
Definition: lists_iterator.hpp:9
ComponentListCompact< T > & getComponentList() const
Retrieves the list of all the components of the same type.
Definition: component_manager.hpp:161
ComponentListSparse< T > & getSparseList() const
Retrieves the list of all the components of the same type.
Definition: component_manager.hpp:178
With the component and system created, we first need to register the component in the component manager. Then, we will update our player entity to contain a MovementCmp, and instead of caching the TransformCmp, we will now cache this component.
nullptr,
"Shield",
&resource_manager.
getMesh(
"Shield"),
),
MovementCmp{Vec3::zero, 1.0f}
);
MovementCmp* player_move =
void addComponentClass(ComponentListType t=ComponentListType::kCompact)
Defines a list for a custom component and makes it ready to use with the engine.
Definition: component_manager.hpp:82
Lastly, we will modify the main loop so that it uses the system.
player_move->direction.y++;
}
player_move->direction.y--;
}
player_move->direction.x--;
}
player_move->direction.x++;
}
MovementSystem(component_manager);
static const Vec3 zero
Vec3(0, 0, 0)
Definition: vector_3.h:129
complete code
#include "ecs/component_manager.hpp"
#include "engine.hpp"
#include "renderer.hpp"
#include "window.hpp"
#include "time.hpp"
#include "ecs/lists_iterator.hpp"
{"Up", {InputButton::W, InputButton::UP}},
{"Down", {InputButton::S, InputButton::DOWN}},
{"Left", {InputButton::A, InputButton::LEFT}},
{"Right", {InputButton::D, InputButton::RIGHT}},
};
struct MovementCmp {
float speed = 0;
};
while (iterator.next()) {
auto [move_cmp, transform_cmp] = iterator.get();
transform_cmp.position_ +=
}
}
int main(int, char**) {
"../assets/obj/sword_shield.obj", "Shield");
"../assets/texture/box.png", "Crate");
nullptr, "Camera",
component_manager.
addEntity(
nullptr,
"Point Light",
auto* player_move = component_manager.
getComponent<MovementCmp>(player);
player_move->direction.y++;
}
player_move->direction.y--;
}
player_move->direction.x--;
}
player_move->direction.x++;
}
MovementSystem(component_manager);
}
return 0;
}
static const Vec3 unit
Vec3(1, 1, 1)
Definition: vector_3.h:131